Add Sign in with Apple to your React App!
AWS Amplify added support for implementing Sign in with Apple to your apps! In this tutorial we'll start from zero by creating an Apple Developer account, then enable Sign in with Apple using the Amplify Admin UI, finally we'll add it to a React app!
Create an Apple Developer account - note that this costs $99 and takes up to 48 hours! You also may need to create a development certificate in your account.
Go to the AWS Amplify Console and create a new backend app. Choose a name for your project, and then open up the Admin UI once your project is initialized.
Click "Enable authentication" in the Admin UI. Under "Add a Login Mechanism" choose "Sign in with Apple". Don't fill anything out yet though!
Then, go back to the Apple Developer Portal and under your profile choose "Certificates, Identifiers & Profiles." Go to the identifiers page through the left-hand navigation bar and then click the plus button.
On the "Register a new identifier" page, keep the selection on "App IDs", then click continue. Then choose "App" on the next page and continue again. Choose a description for your app, for example "Amplify Sign in with Apple Practice App" and then use one of your domains under the Bundle ID, for example
com.welearncode.siwa. Scroll down and select "Sign in with Apple". Then "Continue". Finally, review and register.Now, we'll register a service ID. Go back to the Identifiers page, then on the righthand dropdown choose "Services IDs" and click the plus button. On the next page, keep "Services IDs" selected, then click "Continue". Choose a description for your service, for example "Amplify Sign in with Apple Practice App". Under "Identifier" use what you used for Bundle ID above, but this time with a .sid at the end - for example
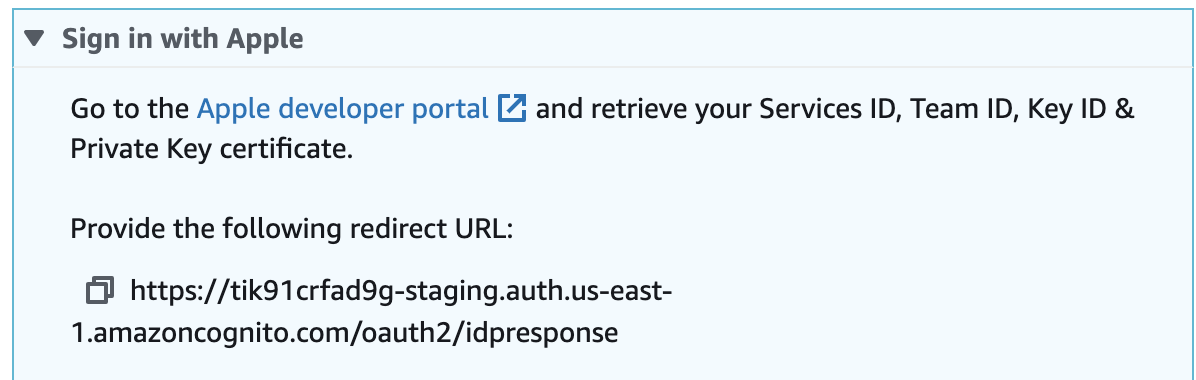
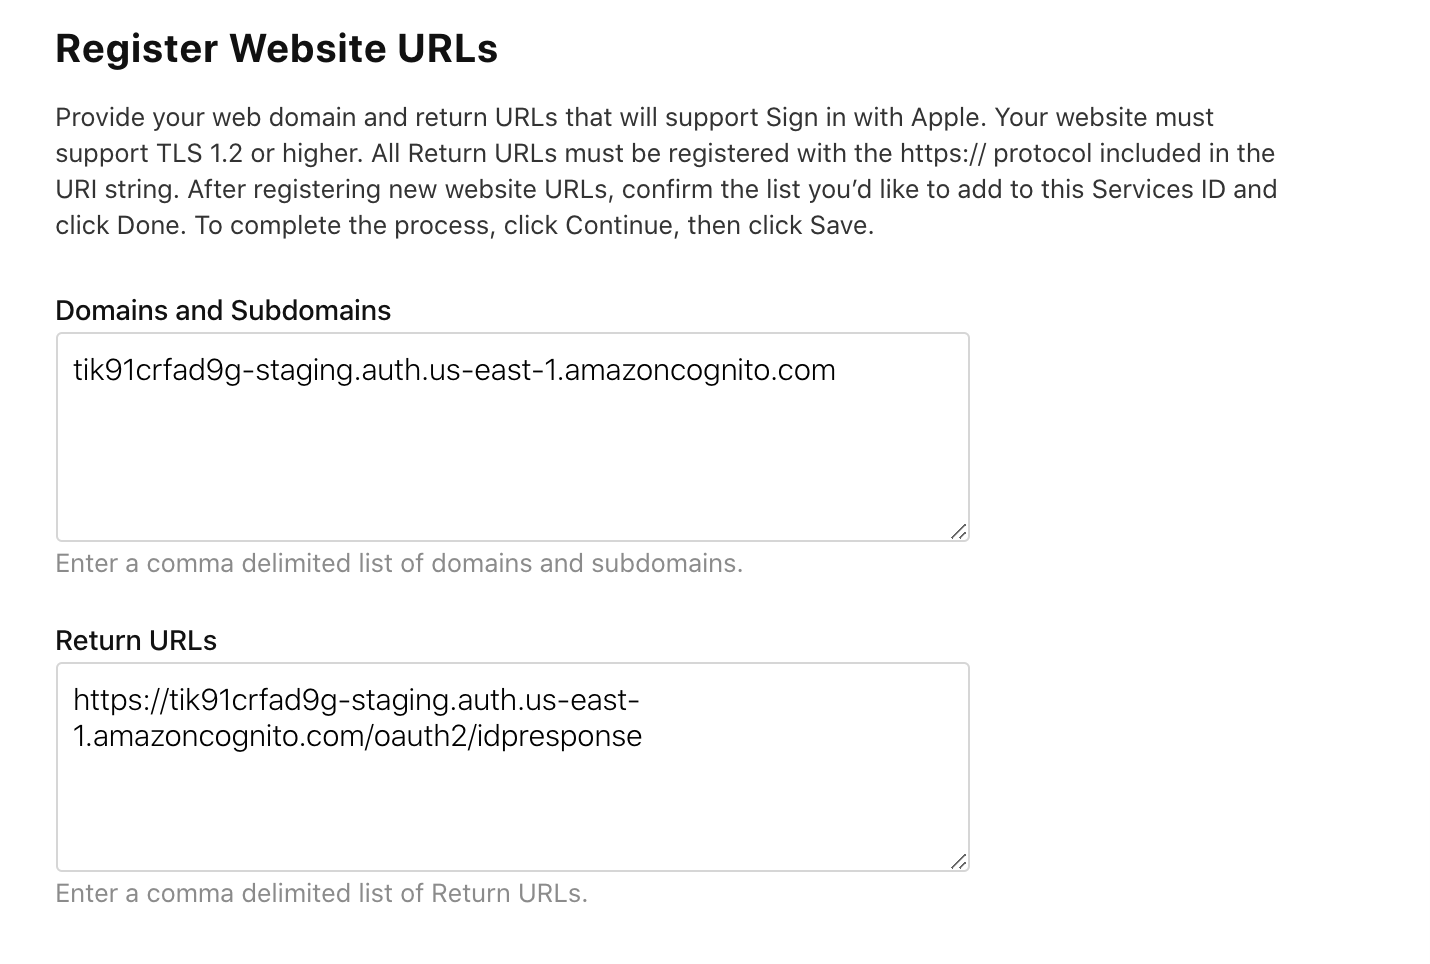
com.welearncode.siwa.sid. Then click register on the next page.Go back to the "Services IDs" page (you should be redirected there!) and click on your created service ID. Check the box under "Enabled", then click the "Configure" button. On your Amplify Admin UI page where you're configuring Sign in with Apple, you should see a redirect URL. Copy and paste it into both "Domains and Subdomains" and "Return URLs". In the first box, "Domains and Subdomains" remove the "https://" and "/oauth2/idpresponse" from the url, just leaving the subdomains and amazoncognito.com. Then click "Next" and "Done".
Last thing to register on the Apple side -- a Key! Select "Key" on the left-hand dropdown and then click the plus button. Name your key and select "Sign in with Apple" below. Click the "configure" button next to "Sign in with Apple". Choose your App ID, then click save. Then continue, and register. Download the key and save it to a place you'll remember, because we'll need to use it in the future!
Now we'll go back to the Admin UI. We'll now fill out the form here! Your Team ID is the App ID you created -- if you go to the "Identifiers" page and select your app, choose the App ID Prefix on your app's page. Your Key ID can be found by navigating to the Key page, selecting your key, and then it will be under "Key ID". Finally your Private Key certificate is that file you downloaded in the last step -- go ahead and upload that. Finally choose a redirect URL -- in development "http://localhost:3000" or similar for your chosen port should work! Then deploy!
Now you can integrate Sign in with Apple into your app. We'll create a very bare bones React app for the sake of this tutorial. First, create a React app.
npx create-react-app siwa-testThen, install the AWS Amplify libraries.
npm i aws-amplifyPull down your Amplify app -- you can find the command to do this for your app on the upper right-hand side of the Admin UI under "Local setup instructions".
amplify pull --appId your-app-id --envName stagingYou may be asked some questions about your app which you should be able to answer with all the defaults!
In your index.js file, add the following in order to configure your project.
// index.js
import awsconfig from './aws-exports'
import Amplify from 'aws-amplify'
Amplify.configure(awsconfig)
Now, clear out the default App.js file, and replace it with an empty React component.
import './App.css'
import { useEffect, useState } from 'react'

function App () {
  return <h1>Hello world!</h1>
}

export default App
Let's implement the UI first: we'll add a conditional based on if a user is signed in or not and render either a sign in or sign out button. We'll import Auth from 'aws-amplify' which will help us implement the functionality.
We'll create a user in state that's set to null to start out. Then if that user is signed in, we'll add a sign out button and render information about that user. If there isn't a user, we'll render a sign in button. We'll use Amplify's federatedSignIn with SignInWithApple. Right now we aren't setting a user, but you can go ahead and sign in with just this code!
import './App.css'
import { useState, useEffect } from 'react'
import { Auth } from 'aws-amplify'

function App () {
  const [user, setUser] = useState(null)

  if (user) {
    return (
      <div>
        <p>User: {JSON.stringify(user.attributes)}</p>
        <button onClick={() => Auth.signOut()}>Sign Out</button>
      </div>
    )
  } else {
    return (
      <button onClick={() => Auth.federatedSignIn({
        provider: 'SignInWithApple'
      })}
      >
        Sign In with Apple
      </button>
    )
  }
}
Now, above the returns we'll add two more functions above the conditional. First, a getUser function that returns the current user. Second, inside a useEffect we'll listen for auth to change, for example if someone signs in or out. If the user signs in using the hosted UI, then we'll get the user and set state with it.
If they sign out, we'll set the user back to null.
function getUser () {
 return Auth.currentAuthenticatedUser()
}

useEffect(() => {
 Hub.listen('auth', ({ payload: { event, data } }) => {
   if (event === 'cognitoHostedUI') {
     getUser().then(userData => setUser(userData))
   } else if (event === 'signOut') {
     setUser(null)
   } else if (event === 'cognitoHostedUI_failure') {
     console.error('Sign in failure')
   }
 })
})
Now we've implemented Sign in with Apple on a React app using Amplify 🍎✨!