Hasura 101: Building a Realtime Game with Graphql and React
My favorite technology discovery of 2019 was Hasura. It makes getting up and running with a full Postgres + GraphQL backend a breeze -- you can pretty much click some things, and then you have a fully interactive database-explorer and editor and GraphQL endpoints you can test with GraphIQL. I want to share a tutorial on building a realtime game (with websockets!!!!) on Hasura based on a workshop I did with them earlier this year.
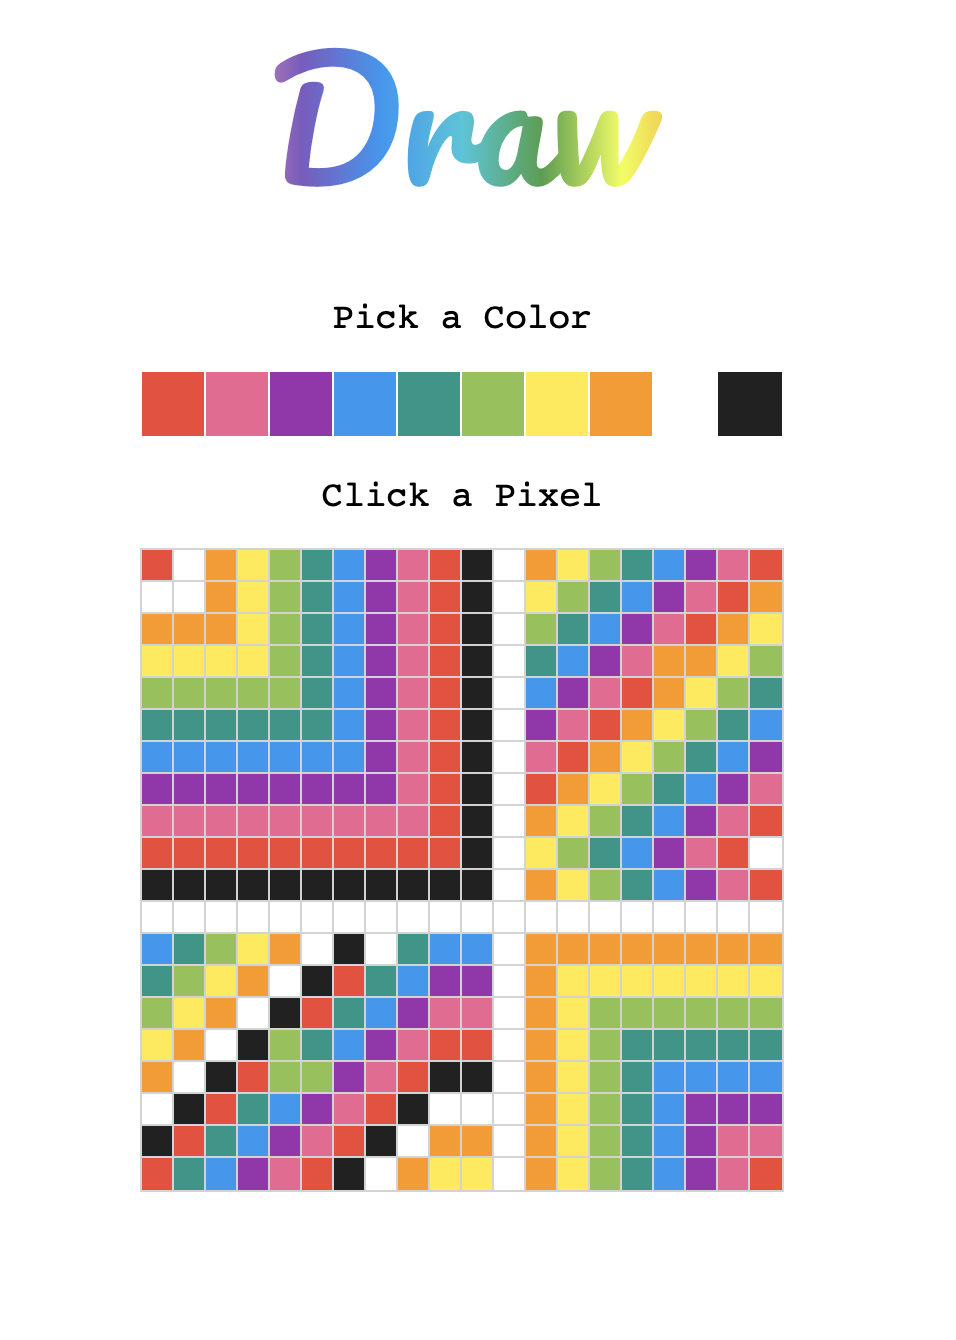
We'll talk about what GraphQL even is, what Hasura is, how to set up Hasura and a database, and then build a full React app on top of it. We'll build a drawing app that looks something like this:
Here is a deployed version of it! (Note: it's using the Heroku free tier so it may take a few seconds to boot up)
What is GraphQl
Well, according to its documentation, "GraphQL is a query language for APIs." Traditionally, with a REST API, you have all sorts of endpoints where you get access to different data or can change the data in some way. That can become pretty bulky pretty fast, and can also become a bottleneck if you're working with separate frontend and backend teams. GraphQL becomes really helpful as our apps evolve over time and need to display different data.
Sacha Grief wrote an awesome analogy in their article "So what’s this GraphQL thing I keep hearing about?".
The old REST model is like ordering pizza, then getting groceries delivered, then calling your dry cleaner to get your clothes. Three shops, three phone calls.
GraphQL on the other hand is like having a personal assistant: once you’ve given them the addresses to all three places, you can simply ask for what you want (“get me my dry cleaning, a large pizza, and two dozen eggs”) and wait for them to return.
GraphQL is also language agnostic (i.e. you can use GraphQL with any programming language), and it lives between your client and your data sources, so it's super flexible!
What is Hasura
Hasura allows you to build a GraphQL backend at lightning speed -- you can just click buttons and make some pretty awesome things.
Hasura:
- Gives you an instant real time GraphQL API on a new or existing database.
- It comes with dashboard that helps you set up your API and database.
- You can react to changes in your database with web hooks, external APIs, or serverless functions on demand.
- You can also stitch together custom GraphQL APIs and other data sources into a unified GraphQL API.
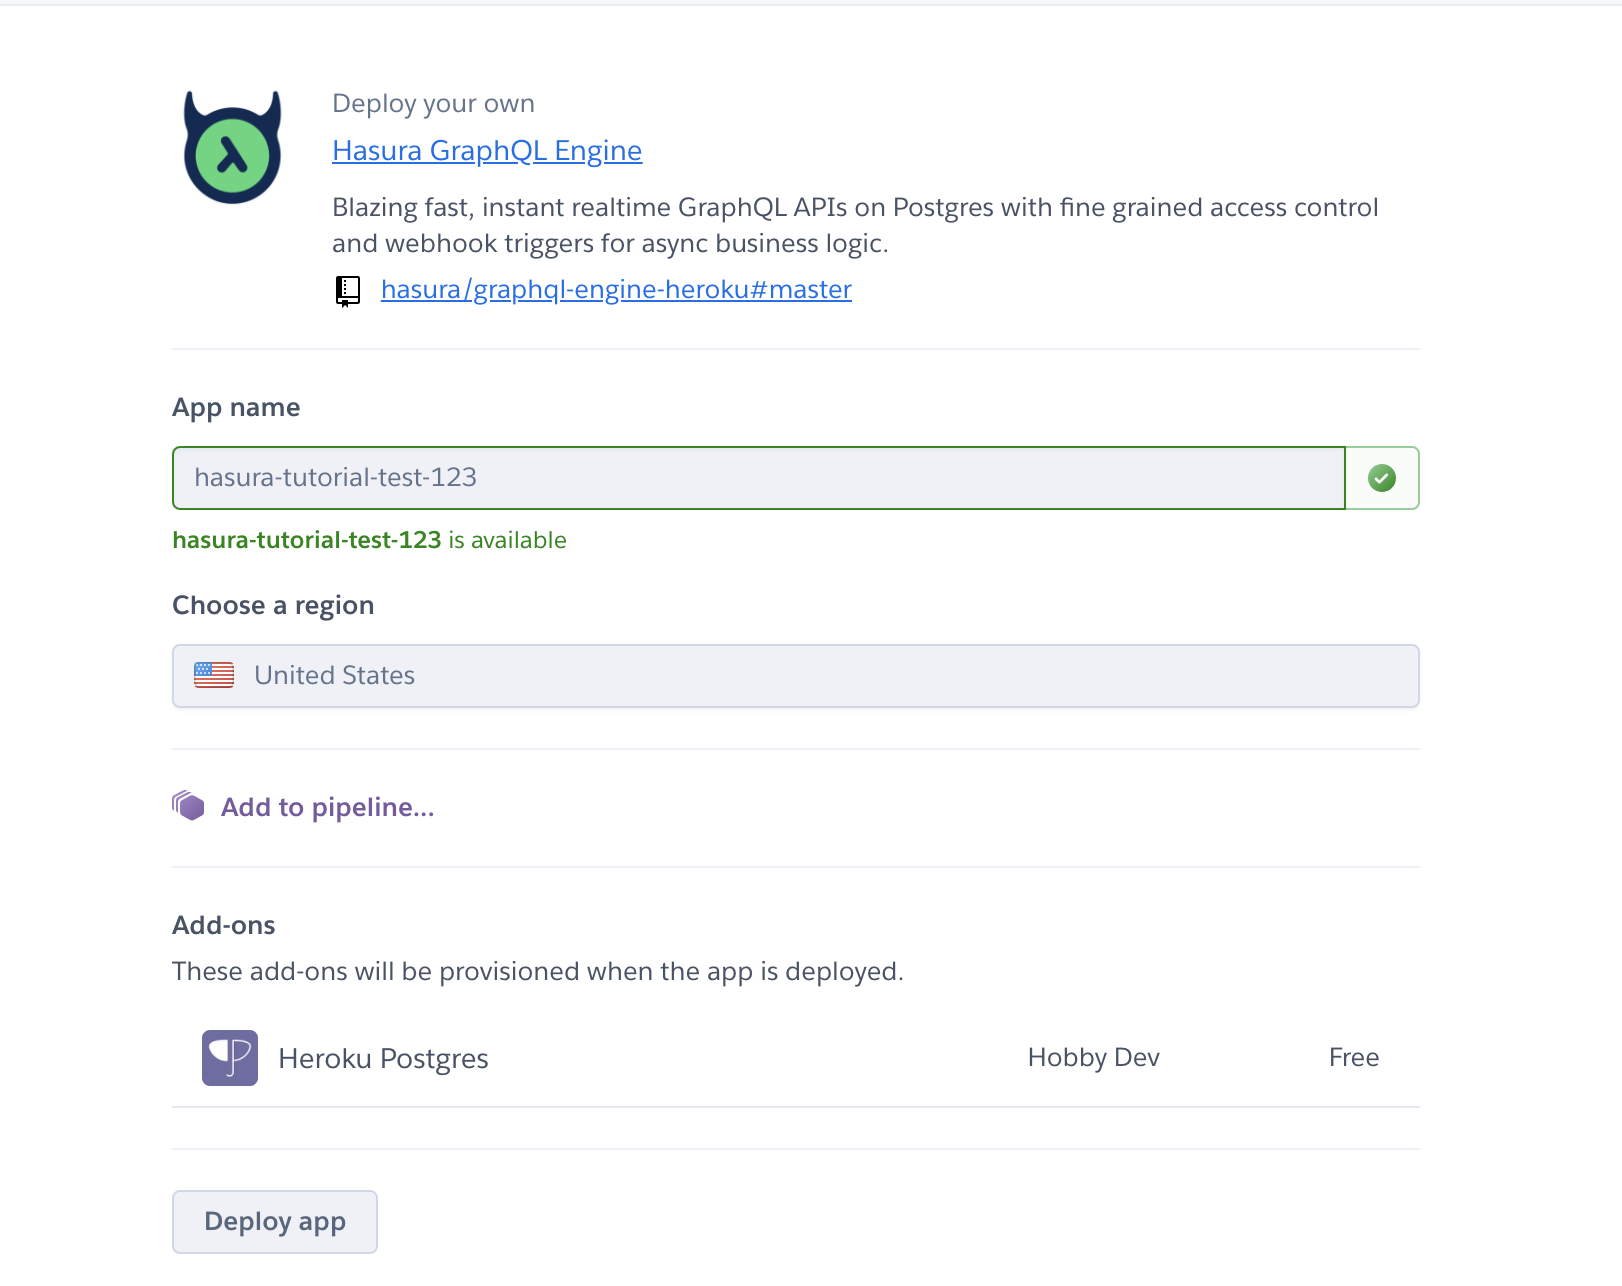
Get Up and Running with Hasura
- Go to this url
- Log in to Heroku (create an account if you haven't, don't worry it's free!)
- Pick a (unique) name for your application
- Click
Deploy app - ✨Magic✨! You've got a deployed Hasura instance up and running!
Set Up the Database
We're using a PostgreSQL database for our application, but Hasura gives us a super nice interface for interacting with that database.
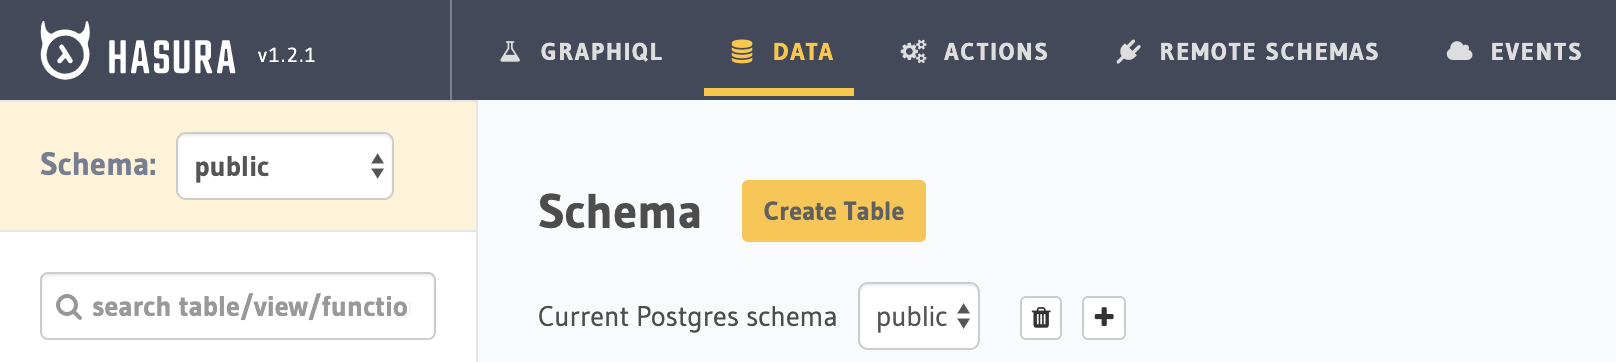
Go to your Hasura app, which should look something like this:
Click on the data tab, and then the create table button next to the Schema header.
We'll create a pixels table in our database to store the coordinates and colors of each pixel.
We will also create two columns in that table: id, which will be an auto-incremented integer that Postgres handles for us, and color which will store the color each pixel should take on.
Also, set id as the primary key.
Here's what your form should look like!
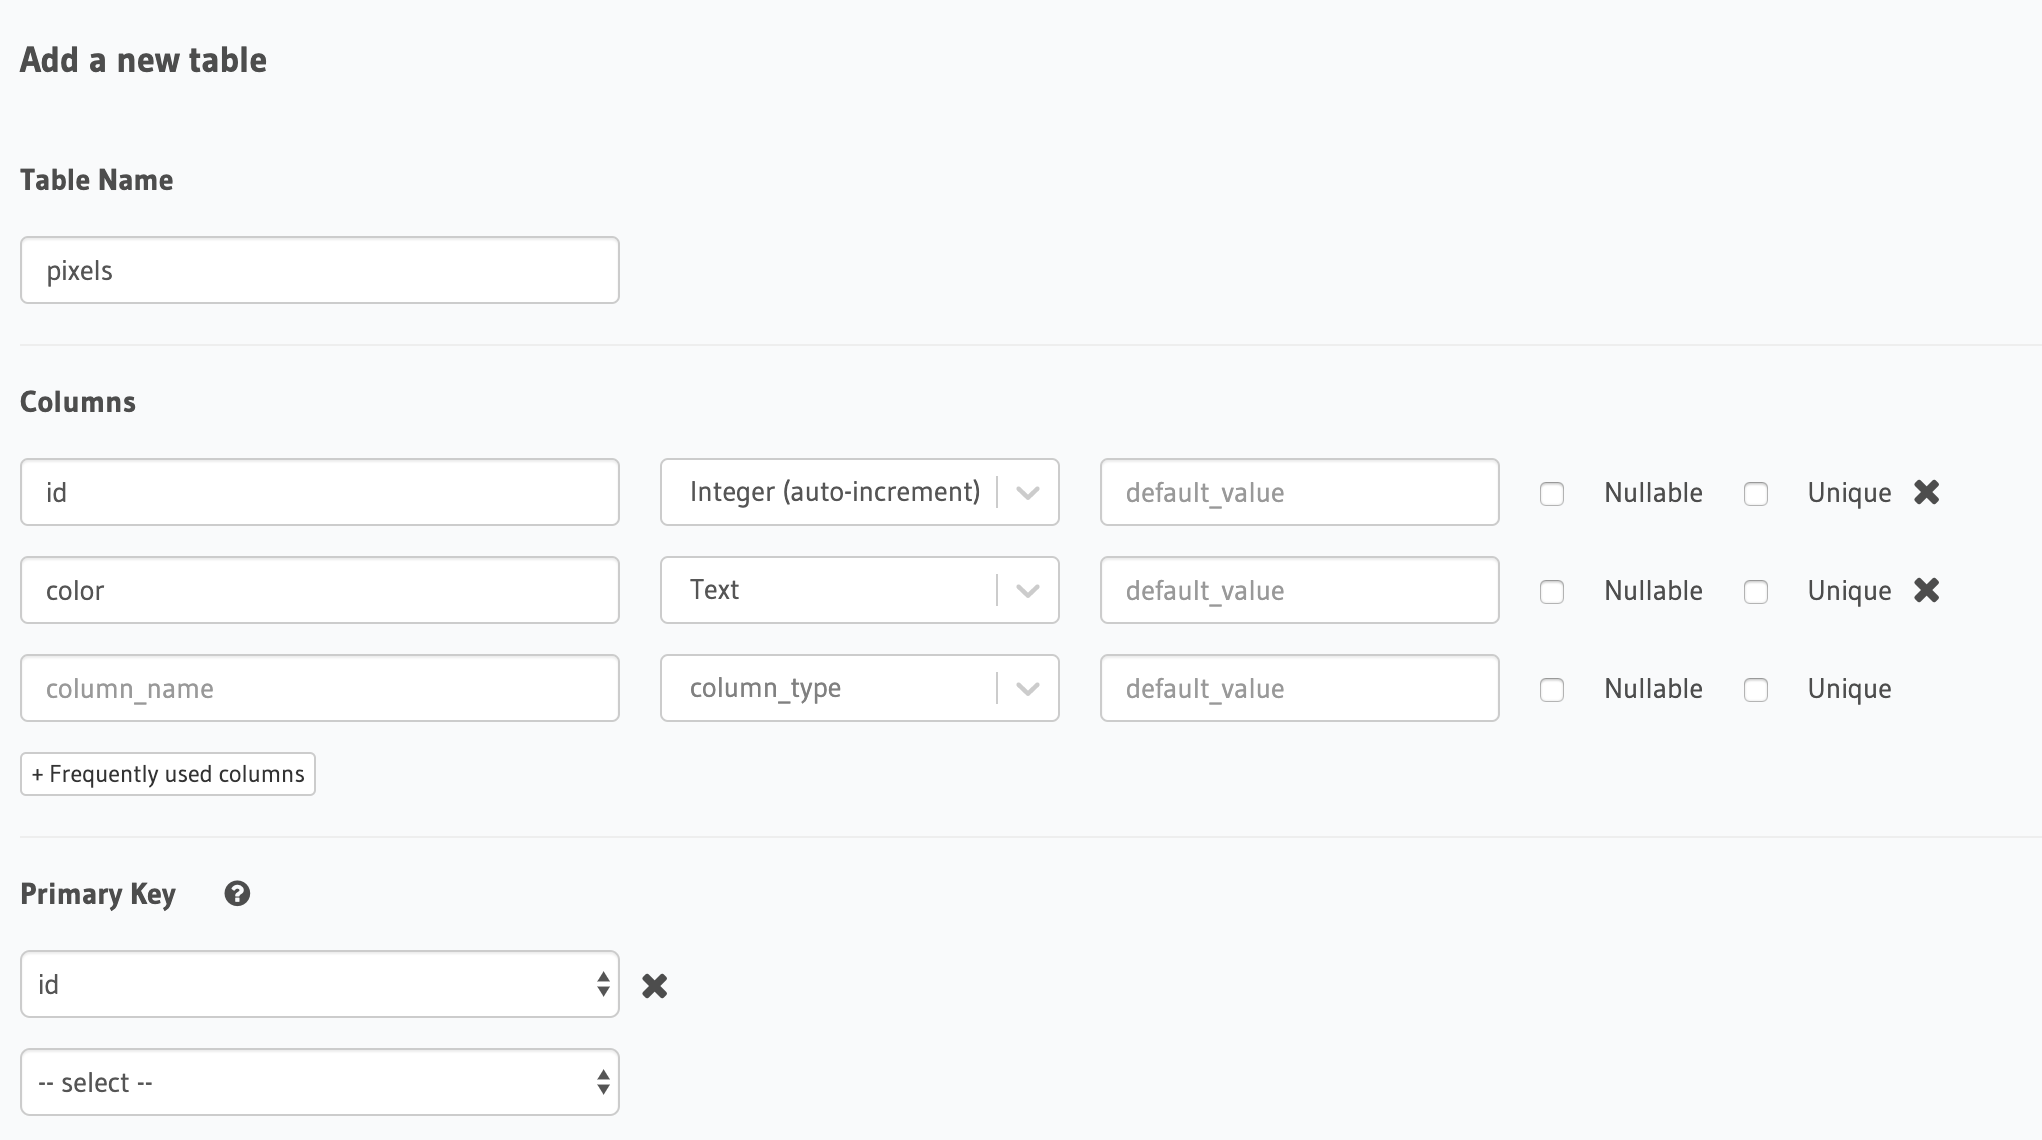
Then, scroll down to the bottom and click the add table button!
We now have a database with the columns we need 🎉!
Adding our Initial Data
The very first time our app loads, we want each pixel to just be a white box until people start coloring them in. To make our future code easier, we'll seed the database with 400 values that all have the color white, since the grid is a 20x20 grid.
Note: you could also store row, column, and color for each pixel, but I've found it easier to just store all 400 pixels and order them by ID on the user interface.
Within the Hasura dashboard, we can run SQL queries by clicking on the SQL link under the tables listing.
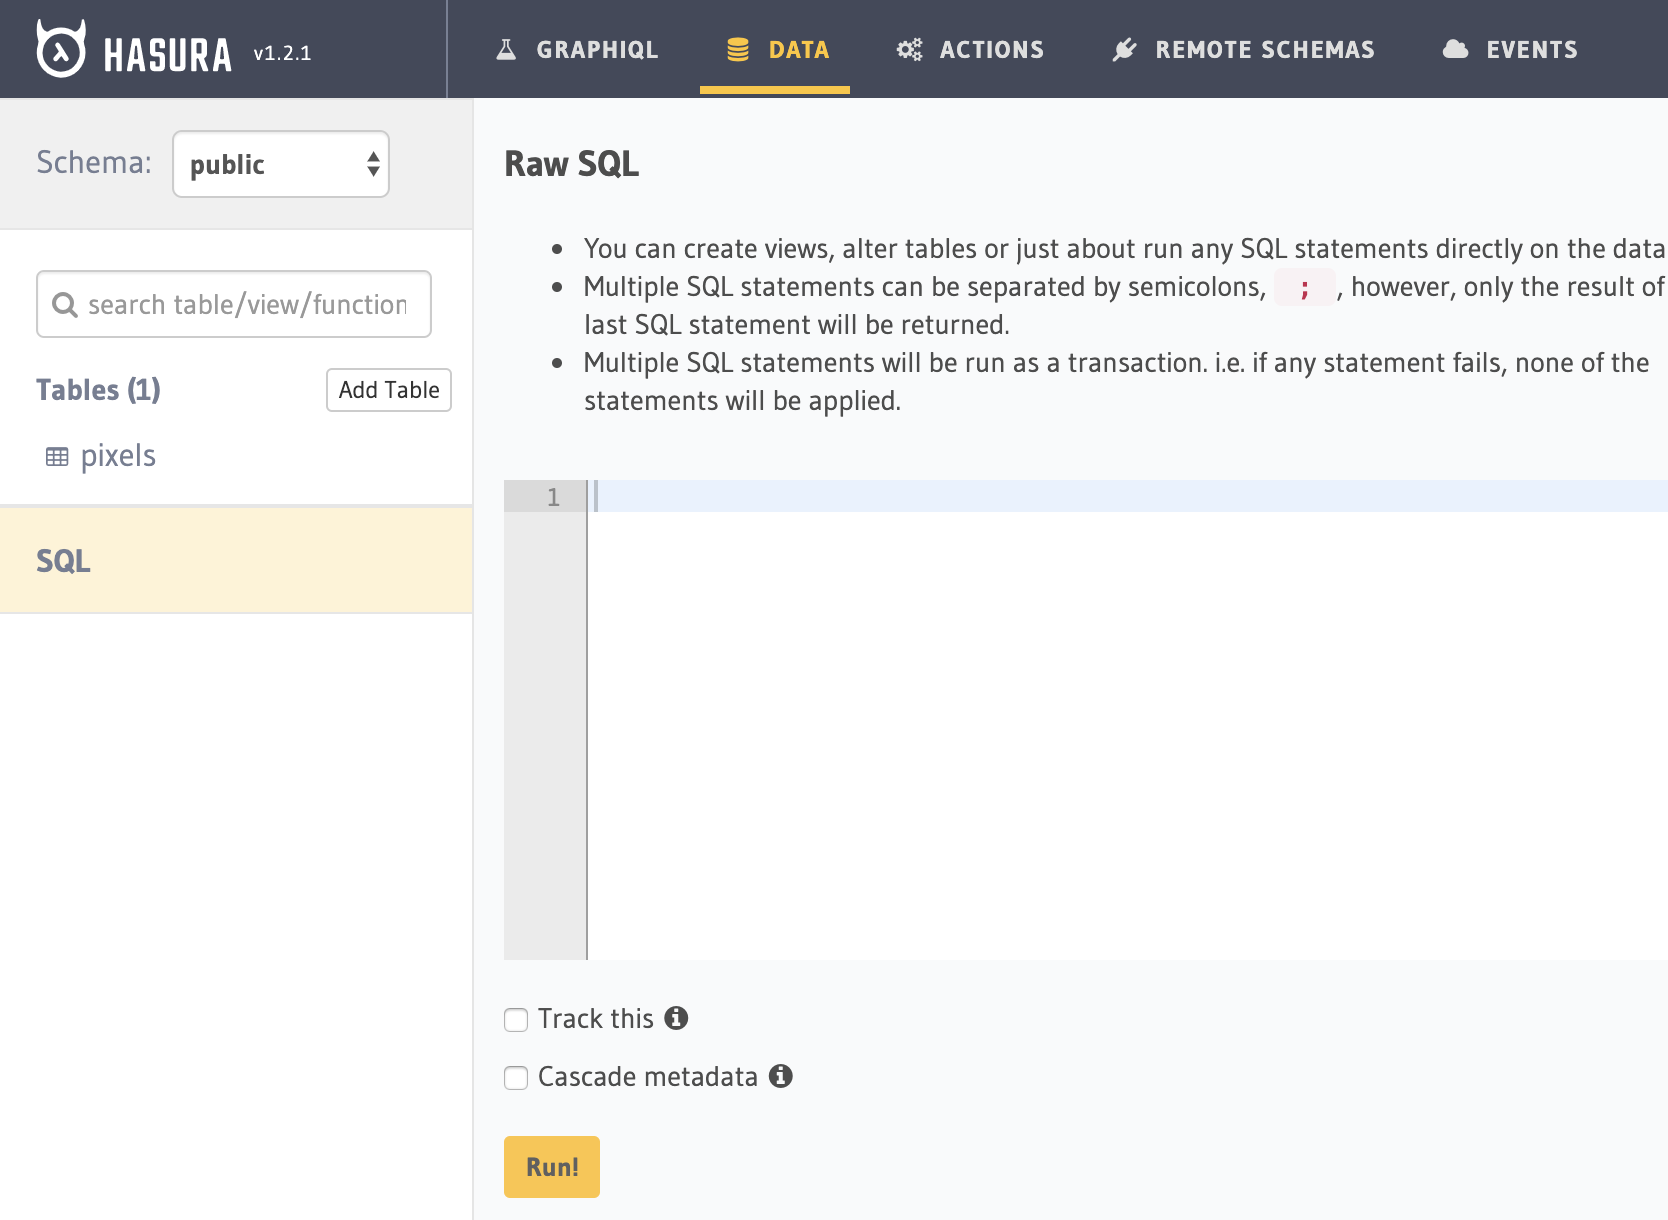
You can add your SQL to the text box that pops up and then press run!
Here is the query I ran to populate the initial database. You can copy and paste the same one to add 400 white pixels to the database!
GraphQL Queries
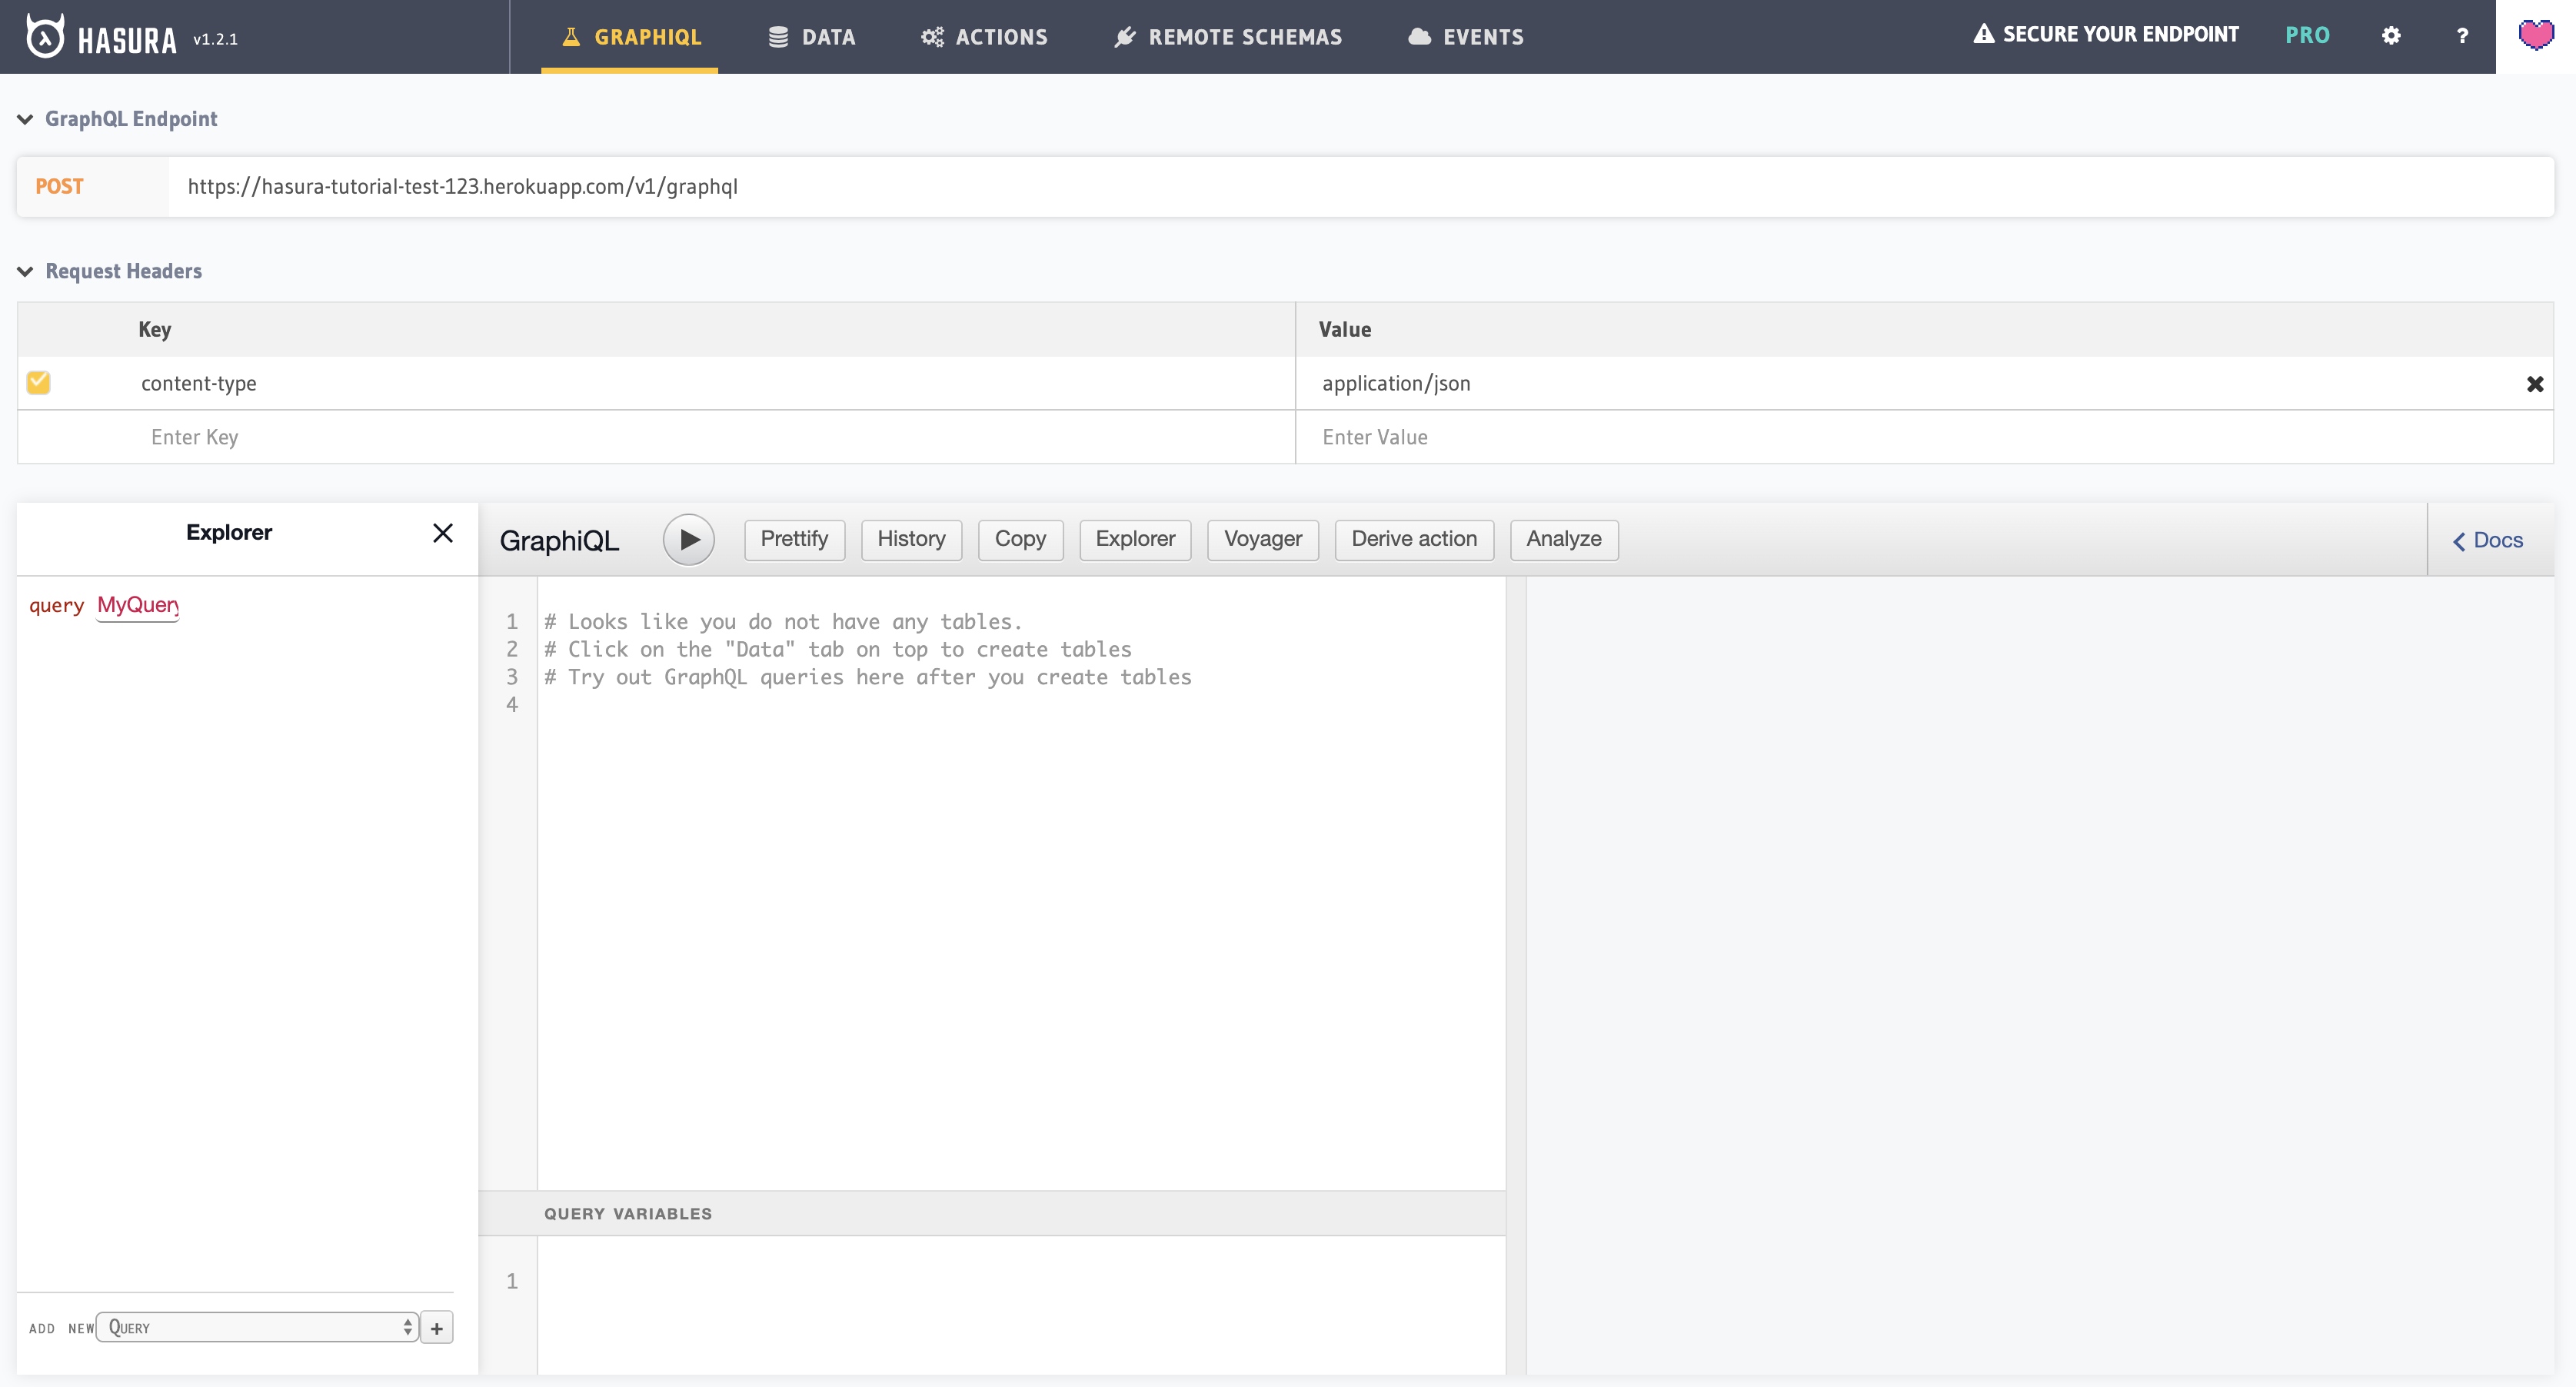
Now that we have data loaded into our database, we can use GraphQL to query that data. We don't need to do any more setup! You can go to the GraphIQL tab of your Hasura dashboard and play with your data.
GraphIQL is an in-browser IDE for exploring GraphQL queries. It will help you write queries to fetch and manipulate your data.
The syntax for a GraphQL query is super different from the SQL queries you may be used to -- they look more similar to JavaScript objects.
For example, to fetch all of our data, our query would look like this:
query GetPixels {
  pixels {
    id
    color
  }
}
First, we name our query GetPixels. Then, we specify that we want to get data from our pixels table. We also say we want the data from the id and color columns. If you omitted one, you'd just get the data from that column back.
We can also change the query so that it always orders the pixels by their id's:
query GetPixels {
  pixels(order_by: { id: asc }) {
    id
    color
  }
}
We can also write subscriptions which are queries that also subscribe to changes in the data via websockets.
Changing the word query to subscription in the above example will allow us to pull new data as it updates.
In addition, GraphQL has mutations which allow us to update data.
For example the following query will allow us to update a pixel's color given its id:
mutation changePixelColor($id: Int!, $color: String!) {
  update_pixels(where: { id: { _eq: $id } }, _set: { color: $color }) {
    returning {
      color
      id
    }
  }
}
This mutation is named changePixelColor, like a programming function, mutations (and queries) can take arguments. In this case, it takes id, which is an integer, and color which is a string. We need to specify the table to query, in this case pixels, which we can do by saying update_pixels. Then, we add a where clause -- we are only going to update the item in the database whose id matches the one specified. Then we specify the _set, where we say that we will set our row's color to the one specified.
Then we add a returning with the data we want sent back to our application once our query is done executing.
I would highly recommend testing out these queries in GraphIQL and using it to build custom queries -- it does a ton for you!
Here is GraphQL's documentation if you want to dive deeper on it, it's awesome!
Integration with React Code
Since this tutorial is focused more on integrating Hasura and GraphQL with an existing application, we'll start with some pre-written React code. This repository has the code we'll be building off of. Right now, it is a static version of the drawing app. One person can make pixel art, but it doesn't connect to a backend, so the drawings don't persist and people can't draw collaboratively.
If you clone down the repository, run npm install to install all of its dependencies. Give the code a quick look through to see what's going on.
Apollo Setup
We'll be using Apollo to make writing our frontend GraphQL connection easier.
In the Connection.js file add the following code:
import { HttpLink } from "apollo-link-http"
import { ApolloClient } from "apollo-client"
import { InMemoryCache } from "apollo-cache-inmemory"

export default new ApolloClient({
  cache: new InMemoryCache(),
  link: new HttpLink({
    uri: "your-endpoint.herokuapp.com",
  }),
})
For the uri, use the GraphQL endpoint at the top of the GraphIQL tab.

This sets up the Apollo client so our GraphQL queries will point to our endpoint we created.
We also need to add a few lines of code to index.js.
import React from "react";
import ReactDOM from "react-dom";
+import { ApolloProvider } from "@apollo/react-hooks";

import "./index.css";
import App from "./App";
import * as serviceWorker from "./serviceWorker";
import connection from "./Connection";

ReactDOM.render(
+  <ApolloProvider client={connection}>
    <App />
+  </ApolloProvider>,
  document.getElementById("root")
);

// If you want your app to work offline and load faster, you can change
// unregister() to register() below. Note this comes with some pitfalls.
// Learn more about service workers: https://bit.ly/CRA-PWA
serviceWorker.unregister();
This gives our whole application access to the GraphQL connection we created. Our queries will automatically go to the right place now.
Query Setup
We need to hit our GraphQL endpoint whenever we go to our application in order to fetch which color each pixel should be. We'll add some code to our App.js file in order to make our application fetch the data we created instead of the static data it's using now!
First, we'll import the gql template tag. This will allow us to write GraphQL queries in our JavaScript code. We'll use our query we wrote earlier to fetch all the the pixels.
const GET_PIXELS = gql`
  query GetPixels {
    pixels(order_by: { id: asc }) {
      color
      id
    }
  }
`
Then, we'll use the useQuery hook that Apollo provides in order to fetch our data.
const { loading, error, data } = useQuery(GET_PIXELS);
This snippet of code will run our query when our component loads.
This hook gives us three values: whether or not the query is still running (loading), the error message if one exists, and the data that comes back from the query.
Before we get our data back, we probably want some sort of loading indicator, so we'll add a condition to our component that does so:
if (loading) {
  return <h2>Loading...</h2>
}
We will also change our map to use the live data instead of the hard coded pixels that we're currently creating on line 5.
data.pixels.map(pixel => <Pixel {...pixel} key={pixel.id} newColor={color} />)All in all, here's what changed in our App.js:
import React, { useState } from "react";
+ import { useQuery } from "@apollo/react-hooks";
+ import gql from "graphql-tag";
import Pixel from "./Pixel";
import ColorPicker from "./ColorPicker";

- const pixels = new Array(400).fill("white");

+ const GET_PIXELS = gql`
+  query GetPixels {
+    pixels(order_by: { id: asc }) {
+      color
+      id
+    }
+  }
+`;

function App() {
+  const { loading, error, data } = useQuery(GET_PIXELS);
  const [color, changeColor] = useState("white");

+  if (loading) {
+    return <h2>Loading...<h2/>;
+  }

  return (
    <div className="content">
      <div className="logo">Draw</div>
      <p>Pick a Color</p>
      <ColorPicker changeColor={changeColor} />
      <p>Click a Pixel</p>
      <div className="container">
+        {data.pixels.map(pixel => (
+          <Pixel {...pixel} key={pixel.id} newColor={color} />
+        ))}
      </div>
    </div>
  );
}

export default App;
Mutation Setup
Now, let's make it so that our Pixel component runs our mutation to change the pixel's color when we click on a pixel. This will make it so that our change persists across users and sessions.
We'll use our gql template tag again, and put our mutation inside it.
const UPDATE_COLOR = gql`
  mutation ChangePixelColor($id: Int!, $color: String!) {
    update_pixels(where: { id: { _eq: $id } }, _set: { color: $color }) {
      returning {
        x
        y
        color
        id
      }
    }
  }
`
Apollo also has a useMutation hook, so we'll import that and use it.
const [updatePixelColor] = useMutation(UPDATE_COLOR)We'll also update our onClick handler to run our mutation when the user clicks on the pixel.
onClick={() => {
    changeColor(color);
    updatePixelColor({ variables: { id, color: newColor } });
}}
Here's what our Pixel.js will look like when we finish converting it:
import React from "react";
+ import gql from "graphql-tag";
+ import { useMutation } from "@apollo/react-hooks";

+ const UPDATE_COLOR = gql`
+   mutation ChangePixelColor($id: Int!, $color: String!) {
+     update_pixels(where: { id: { _eq: $id } }, _set: { color: $color }) {
+       returning {
+         color
+         id
+       }
+     }
+   }
+ `;

const Pixel = ({ id, color, newColor }) => {
+  const [updatePixelColor] = useMutation(UPDATE_COLOR);

  return (
    <span
      className="pixel"
      onClick={() => {
         changeColor(color);
+        updatePixelColor({ variables: { id, color: newColor } });
      }}
      style={{ backgroundColor: color }}
    ></span>
  );
};

export default Pixel;
Woo! 🙌🏻 Now our application connects to our GraphQL endpoint and pulls the correct data. Here's the solution code if you want to see it in its entirety!
Making it Real Time
Right now, our application pulls from our GraphQL endpoint on page load, but it doesn't real-time update when another user clicks on a pixel. We want our users to be able to draw in real time with their friends. You can try this by opening up the deployed app in two tabs -- if you update a pixel in one tab, the other should update too.
We just need to update our App.js to use a GraphQL subscription instead of a query.
We'll use Apollo's useSubscription hook instead of useQuery and change the word query in our query to subscription. Magic 🧙🏻♂️!
Here's a diff showing what changed! (Note: much of the file is omitted since not much changed)
import React, { useState } from "react";
+ import { useSubscription } from "@apollo/react-hooks";
import gql from "graphql-tag";

import Pixel from "./Pixel";
import ColorPicker from "./ColorPicker";

const pixels = new Array(400).fill("white");

const GET_PIXELS = gql`
+  subscription GetPixels {
    pixels(order_by: { id: asc }) {
      color
      id
    }
  }
`;


function App() {
  const [color, changeColor] = useState("white");
+  const { loading, error, data } = useSubscription(GET_PIXELS);

...
Here is the full code with subscriptions!
Next Steps
You could add some custom backend game logic with Hasura Actions.
If you want to learn more about GraphQL, here's an awesome course.
If you want to dive deeper into building a backend with Hasura here's another course.
There are a ton more tutorials on Hasura's site.
Conclusion
I have so much fun building applications with this stack -- it allows me to focus solely on the frontend code for simple applications. I can create an application that allows two users to interact in realtime with very little friction. Traditionally, writing a full backend with a GraphQL layer is a pretty extensive process that requires a lot of maintenance. With Hasura, we can do this with a couple clicks. This is my new go-to stack for building quick apps.
Can't wait to see what you create!